
What to Check After Replacing Your Laptop Screen: Complete Checklist
Use this practical checklist to test a replacement laptop screen, diagnose common display faults safely and decide when the repair needs attention.
A replacement laptop screen can light up and still be wrong. A loose bezel, intermittent cable fault, incompatible panel or missed touchscreen connection may only become obvious when you change the lid angle, unplug the charger or use the laptop for a while.
The best time to find those problems is immediately after the repair, while the work and the replacement part can still be reviewed. This checklist starts with safe, non-invasive tests, then explains what common symptoms mean and when to stop rather than reopen the laptop.
Key takeaways
- Check the panel, fit, brightness, colours, motion, camera and touch functions before accepting the repair.
- Test with the lid at different angles and on both charger and battery power; intermittent faults can hide during a quick startup check.
- Use the recommended resolution and a refresh rate that the new display actually supports.
- A working external monitor narrows the fault, but it does not prove that the replacement panel alone is defective.
- Stop if you notice heat, a burning smell, sparks, liquid damage, a swollen battery or a pinched cable.
Before you start: record the repair and make it safe
If a repairer fitted the screen, keep the invoice, part details and warranty terms nearby. Photograph any visible gap, mark, bright spot or distortion before cleaning or adjusting anything. Note whether the fault occurs from startup, only after Windows loads, only on battery, or only at a particular lid angle. Clear evidence makes a return visit or part claim easier.
Save open work before testing. Most checks below are observational and reversible, but a flickering or blank display can interrupt work without warning. Do not press on the panel, twist the lid or use so-called pixel-fixing pressure techniques. Dell's current pixel guidance, for example, warns against applying pressure or relying on pixel-fixing software because this can damage a display and affect warranty coverage (Dell Display Pixel Guidelines). The exact pixel warranty varies by manufacturer, model, panel and supplier, so check the terms that came with your part or repair.
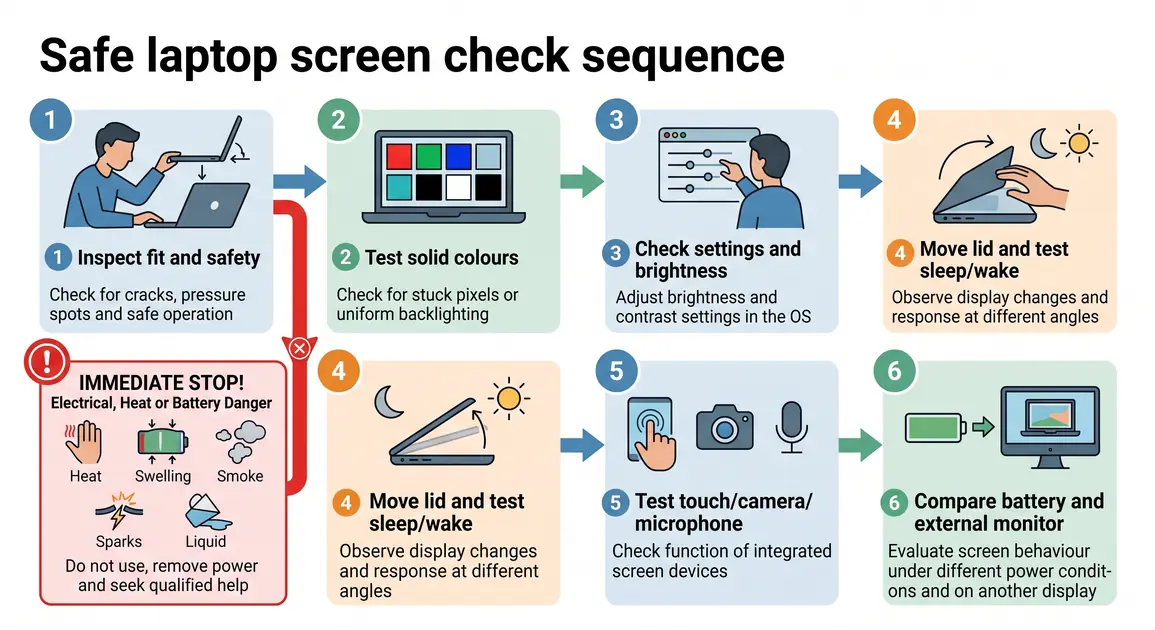
Stop using the laptop and disconnect the charger if it is safe to do so if you notice smoke, sparks, a burning smell, unusual heat, liquid exposure or a case that is bulging or separating. A swollen battery can push against the display assembly or palm rest; HP advises discontinuing use of an affected notebook until the battery is replaced (HP guidance on battery swelling). Do not squeeze the case closed or puncture a battery.
1. Inspect the panel, bezel and hinges
Turn the laptop off first and inspect it under good, indirect light. You are looking for damage or poor fit introduced during transport or reassembly, not trying to dismantle it again.
Check that:
- the panel sits evenly within the bezel, without one corner standing proud;
- the bezel clips are closed and there are no unexplained gaps;
- there are no cracks, scratches, pressure marks, trapped debris or adhesive showing;
- the webcam, microphone openings, light sensor and Wi-Fi antenna covers have not been obstructed;
- the lid opens and closes smoothly without scraping, popping or unusual resistance; and
- the hinges hold the display at normal working angles without sudden movement.
Open and close the lid slowly through its normal range while the laptop is running. Do not force it past its usual stop. If the picture cuts out, changes colour, develops lines or flickers at a particular angle, record the angle and stop repeatedly flexing it. That pattern can point to a disturbed or damaged display cable near the hinge, but diagnosis still requires inspection by a competent technician.
A bezel gap is not merely cosmetic if it grows when the lid moves. It may mean a clip, screw, adhesive strip, cable or hinge is not seated correctly. Arrange a review before the gap allows dust in or places pressure on the new panel.
2. Check for dead pixels, lines, light bleed and uneven colour
Clean the display gently with a dry microfibre cloth so dust is not mistaken for a pixel fault. Then view full-screen solid black, white, red, green and blue backgrounds at a comfortable brightness. Avoid downloading unknown test utilities; simple locally created images or a trusted manufacturer diagnostic are enough.
Look from your normal viewing position for:
- fixed black, white or coloured dots;
- vertical or horizontal lines;
- patches that remain dark or unusually bright;
- colour tint that changes sharply across the panel;
- image retention or ghost shapes;
- flickering areas; and
- severe light leakage around the edges.
A little glow visible at an angle on a dark screen can be characteristic of some LCD panels, while a fixed bright point, obvious blotch or line may be a defect. Do not assume that every pixel issue automatically qualifies for replacement: policies differ. Count and photograph persistent defects, then compare them with the supplier's written return or pixel policy.
Some manufacturers provide a display self-test that works before the operating system loads. On supported Dell laptops, for example, holding D while pressing the power button starts an LCD built-in self-test that cycles through solid colours. Dell says a fault visible during that test is inherent to the display path rather than a Windows app (Dell LCD self-test instructions). That key sequence is Dell-specific. For another brand, use the exact manual or support page for your model rather than guessing at startup keys.
3. Confirm brightness, colour, resolution and refresh rate
Boot normally and move the brightness control from low to high in several steps. The image should change smoothly and remain stable. If brightness jumps, stays fixed, pulses or becomes uneven, test once on charger and once on battery. Some laptops use automatic or content-based brightness controls, so a small change can be normal; Windows exposes these options under Settings > System > Display > Brightness on supported devices (Microsoft brightness and colour guidance).
Next, check Settings > System > Display. In Windows 11, the resolution marked Recommended is normally the panel's intended native resolution. A lower resolution can make text soft, stretch the image or add borders. Microsoft recommends using the listed recommended resolution and notes that unexpected resolution changes can also involve the graphics driver (Microsoft resolution guidance).
Open Advanced display and check the refresh rate. Choose only a rate Windows offers for that display, ideally the panel's documented normal rate. Do not assume that every replacement should be set to 60 Hz or that a higher number is automatically better. Available rates depend on the display, and Microsoft warns that choosing some combinations can also change resolution (Microsoft refresh-rate guidance).
Compare familiar photos, neutral greys and readable text rather than judging colour from one highly edited video. A replacement may use a different panel technology or colour profile from the original even when it is electrically compatible. If accurate colour is essential for design or photography, confirm the exact panel specification and use proper calibration equipment; the basic Windows sliders cannot turn a low-gamut panel into a wide-gamut one.
4. Test motion, flicker and intermittent faults
Use the laptop normally for 20 to 30 minutes. Scroll a long page, move windows, play a locally stored or trusted online video and wake the laptop from sleep. You do not need to run a demanding game or stress test: heavy GPU load mainly tests the graphics system and cooling, not whether a newly installed panel is correctly fitted.
During ordinary use, watch for:
- flicker when the brightness changes;
- brief blackouts when the lid moves;
- coloured blocks, sparkles or scrambled areas;
- tearing or judder that appears only at one refresh rate;
- a picture that disappears after sleep; and
- distortion that appears as the laptop warms up.
If Windows flickers but the image was stable during a manufacturer pre-boot test, software becomes more plausible. Microsoft recommends checking whether Task Manager flickers with the rest of the screen: if it does, the display driver is a likely cause; if it does not, an incompatible app is more likely (Microsoft screen-flicker troubleshooting). This is a diagnostic clue, not proof.
Install normal Windows updates and use the laptop manufacturer's support channel for model-specific graphics or firmware updates. Avoid random driver-download sites. Do not update BIOS or firmware merely because the panel was replaced; that carries more risk and should be attempted only for a documented model-specific reason, with stable power and recovery information available.
5. Test the touchscreen, pen, camera and lid sensor
On a touchscreen model, test taps in every corner and along all four edges, then drag an icon slowly across the screen to reveal dead zones or offsets. Try scrolling, pinch-to-zoom and the active pen if the laptop supports one. Confirm that touch follows the correct display if an external monitor is connected.
A display assembly can contain more than the LCD panel. Depending on the laptop, the repair may disturb the touch digitiser, webcam, microphones, ambient-light sensor, Wi-Fi antennas or lid-closed sensor. Test a camera preview, make a short local microphone recording, check Wi-Fi stability at the same desk used before the repair and close the lid once to confirm the configured sleep action still occurs. Delete the test recording afterwards if it contains private conversation.
If touch is completely absent immediately after the repair, do not start uninstalling unrelated graphics drivers. Check Windows Update and the manufacturer's model-specific support information, but a missed digitiser connection or an incompatible touch assembly may require the repairer to reopen the device. Likewise, a webcam that disappears from Device Manager after screen work is stronger evidence of an assembly connection issue than of a display setting.
6. Compare charger, battery and external-display behaviour
Use the display for a few minutes with the approved charger connected, then save your work and repeat on battery. Brightness may intentionally reduce on battery because of power settings, but the screen should not flicker, show lines or switch off unpredictably. If the fault occurs only in one power state, record that condition rather than repeatedly plugging and unplugging the charger.
An external monitor is useful for narrowing the problem. Connect one known-good monitor or television with a known-good cable, then use Settings > System > Display > Multiple displays > Detect if Windows does not show it automatically; this is the current Windows 11 path documented by Microsoft (Microsoft multiple-monitor guidance).
Interpret the result carefully:
- External display works, replacement screen does not: the new panel, its cable, backlight power, connector, compatibility or lid assembly becomes more likely. It does not identify which one.
- Both displays show the same artefacts: software, the graphics processor or a broader system fault becomes more likely.
- The external display works until Windows loads: a driver, display mode or app may be involved.
- Neither display works and the laptop shows no normal startup signs: this may be a no-power or no-start problem, not a screen-only fault.
Testing several monitors rarely adds value once one known-good display and cable have produced a clear result. VGA is now legacy but still encountered on older laptops; HDMI, DisplayPort over USB-C and docks are more common on current systems. A USB-C port does not necessarily support video, so confirm the laptop's specifications before treating a failed USB-C connection as evidence of a screen fault.
7. Check that the replacement panel is genuinely compatible
Two panels can share the same diagonal size and still be incompatible. Relevant details can include the exact panel part number, connector type and position, pin count, resolution, refresh rate, backlight requirements, mounting points, thickness, touch integration, webcam or sensor arrangement, and firmware-dependent features. An image that appears does not guarantee that brightness control, sleep behaviour or touch will work correctly.
If a repairer supplied the part, ask for the replacement part number and whether it is original, refurbished or a compatible aftermarket panel. If you supplied it, compare the seller's listing with the laptop's service documentation and the original panel identification. Marketing phrases such as “fits this model” are not as strong as a verified part cross-reference, especially when one laptop model was sold with several screen options.
Do not connect a loose laptop panel to another device as a casual test. Laptop display panels are not plug-and-play external monitors, and an incorrect connector or power arrangement can damage the panel or motherboard. Compatibility and internal cable inspection belong with someone competent to follow the service manual and electrostatic-discharge precautions.
8. Match the symptom to the safest next step
Use the pattern you recorded to decide what happens next:
| Symptom | Useful safe check | Likely next step |
|---|---|---|
| Blank internal screen, external display works | Check brightness, display detection and a model-specific pre-boot test | Return for panel, cable, backlight or compatibility diagnosis |
| Flicker changes with lid angle | Stop flexing the hinge and record the angle | Cable routing or hinge-area inspection by a technician |
| Lines or defects appear in a pre-boot LCD test | Photograph the result and check the part warranty | Replacement-panel or display-path review |
| Flicker begins only after Windows loads | Compare Task Manager behaviour; install supported updates | Driver or incompatible-app troubleshooting |
| Touch, camera or microphone failed after the repair | Confirm the device is detected and check supported updates | Assembly connection or compatibility review |
| Case bulges or bezel lifts with heat | Shut down, disconnect power if safe and do not press it closed | Urgent battery and internal-hardware inspection |
Do not reopen the laptop solely to “make sure the cable is tight” unless you are trained, have the correct service manual and are authorised to do so. Internal batteries may remain live even when the laptop is shut down. A connector can be damaged by misalignment, excess force or reconnecting it with power present. Opening the machine may also affect a repair or manufacturer warranty.
If a shop completed the work, give it the first opportunity to inspect a fault that appeared immediately afterwards. Provide the photographs and conditions you recorded. If the screen was a DIY replacement and any internal rework is beyond your experience, a technician can confirm the panel part, cable condition and power path without turning trial and error into a second fault.
When to arrange professional help in Perth
Arrange help promptly if the screen stays blank, the image cuts out with lid movement, a connector or cable may be damaged, touch or camera functions disappeared, the replacement part is uncertain, or there is any heat, swelling, burning smell, smoke, sparking or liquid exposure. Hardware inspection is generally an onsite or workshop task; software-only flicker that begins after Windows loads may sometimes be assessed remotely.
For a broader diagnosis, see Perth Computer Experts' computer repairs and maintenance service. If you want the completed repair checked, use the verified contact page and include the laptop model, replacement part number, who fitted it and exactly when the symptom occurs. A concise symptom record is more useful than repeatedly dismantling or restarting the machine.