
Professional vs DIY SSD Data Recovery: How to Choose
Learn when DIY SSD recovery is reasonable, when to stop, how TRIM changes deleted-file recovery, and when professional assessment is the safer choice.

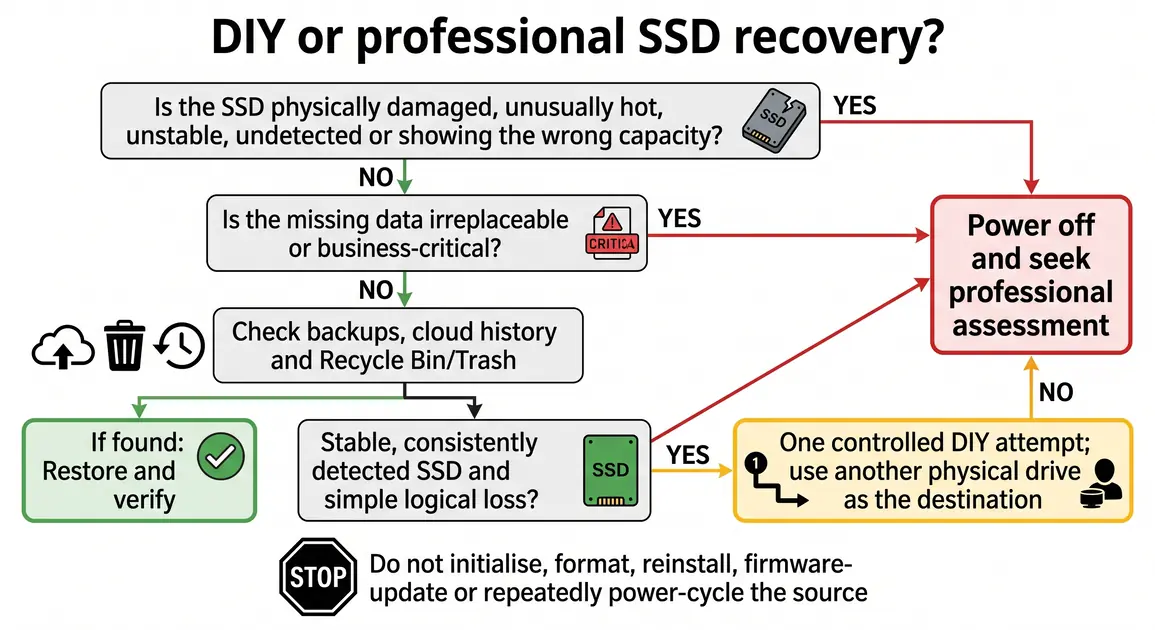
An SSD problem creates an awkward decision: try something yourself and risk making recovery harder, or stop and pay for an expert assessment when the fault might be simple. The right answer depends less on confidence than on three things—the failure symptoms, the value of the missing files and whether the drive is still stable enough to read safely.
This guide compares professional and DIY SSD data recovery for home users, remote workers and small businesses. It explains what you can check without writing to the affected drive, how TRIM and encryption affect the odds, and the warning signs that mean experimentation should stop.
Key takeaways
- Check backups and cloud version history before running recovery software.
- DIY recovery is most defensible for a healthy, detected SSD with a simple logical loss and non-critical data.
- Stop if the SSD disappears, disconnects, overheats, suffered liquid or impact damage, or holds irreplaceable files.
- TRIM can make deleted SSD data unavailable; disabling it after deletion does not restore blocks already deallocated.
- Whatever method you choose, recover files to a different physical drive and verify the results before reusing the SSD.
Start with the value of the data, not the drive
Before diagnosing hardware, decide what a failed recovery would cost. Family photos with no other copy, current client records, accounting data and a sole trader's active job files deserve a more conservative approach than replaceable downloads. If the only copy is important, the safest first action is to shut the computer down and avoid further writes.
This is also the point to confirm what is genuinely missing. Check the Recycle Bin or Trash, cloud storage, another synced device, email attachments, external backups and application-specific backup folders. Pause before reconnecting devices that might synchronise deletions. A valid backup changes the task from recovery to restoration and avoids unnecessary work on a questionable SSD.
For a Perth household or small business, downtime matters too. A cheap DIY attempt can become expensive if it consumes a day, changes the evidence on the drive and still ends with a specialist. Conversely, professional laboratory recovery may be disproportionate when the data is replaceable and the SSD remains healthy. The best option is the one that controls the risk around the data you actually need.
Identify the kind of SSD data loss
SSD data loss falls into several broad categories. They can look similar from the desktop, but the appropriate response is different.
Accidental deletion or formatting
The SSD is detected normally, the computer is stable and files disappeared after a known action. This is a logical loss rather than obvious hardware failure. Check backups first. Recovery software may be reasonable, but modern SSD behaviour means deleted files are not guaranteed to remain recoverable.
File-system or operating-system trouble
The SSD appears in firmware or the operating system, but a partition will not mount, Windows asks to initialise or format it, or folders are unreadable. Do not initialise, format, reinstall the operating system or run a repair that writes changes before the data is protected. Those actions can overwrite metadata needed for recovery. A read-only assessment or image by a competent technician is safer.
Intermittent or undetected SSD
The drive vanishes, appears with the wrong capacity, disconnects during reads, causes repeated freezes, or is absent from both the computer's firmware and operating system. Consumer recovery software cannot scan a drive the system cannot communicate with reliably. Repeated restarts and reconnections may add stress without solving a controller, firmware, power or NAND flash fault.
Physical, electrical or environmental damage
Stop immediately after liquid exposure, impact damage, a burning smell, smoke, sparks, unusual heat or a swollen laptop battery. Disconnect mains power if it is safe to do so, do not open a power supply or battery pack, and do not keep testing the SSD. These are equipment and personal-safety issues as well as data-recovery problems.
SSDs have no moving platters, so clicking or grinding from a computer usually comes from another component such as a fan or hard drive. It is still a reason to power down and identify the source rather than assume the SSD itself is making the noise.
What TRIM changes about deleted-file recovery
TRIM is the common name for a notification that tells storage which logical blocks the file system no longer needs. Microsoft's current documentation calls this delete notification or TRIM/unmap and says it is enabled by default for NTFS unless an administrator disables it. The current NVMe specification describes the equivalent deallocate operation, under which a controller may deallocate the supplied ranges. (Microsoft Learn, NVM Express)
That matters because the familiar hard-drive assumption—deleted data stays in place until another file overwrites it—does not reliably apply to an SSD. Once the operating system has notified the device and the controller has processed the deallocation, ordinary undelete software may receive zeros or otherwise have no access to the former content. Timing varies with the operating system, file system, connection, controller and drive state, so nobody can promise recovery merely because the deletion was recent.
Do not disable TRIM as a routine recovery tactic. Changing the setting after a deletion cannot reverse a deallocation already processed, and changing storage behaviour on the affected computer introduces another write-capable administrative action. TRIM is a normal, current storage-management feature, not a fault to remove pre-emptively. If evidence preservation matters, power the device off and seek advice instead.
TRIM mainly changes accidental-deletion recovery. It does not by itself diagnose an SSD that has lost power, suffered controller failure or developed unreadable flash. Those cases require different assessment.
When a DIY SSD recovery attempt is reasonable
A limited DIY attempt can make sense when all of these conditions apply:
- the SSD is detected consistently and reports the expected capacity;
- there is no liquid, impact, electrical or heat damage;
- the computer is not freezing or disconnecting during reads;
- the loss is understood, such as a recent deletion on a secondary drive;
- the files are useful but not irreplaceable or business-critical; and
- you have a separate destination drive with enough free space.
Start with the least invasive path. Restore from a known-good backup or cloud version history if available. If the SSD is readable, copy still-accessible priority files to another physical device before experimenting. Do not install recovery software on the affected SSD, boot repeatedly from it, create a new partition on it or save recovered files back to it.
Microsoft's supported Windows File Recovery tool illustrates the essential separation rule: its source and destination must be different drives or partitions, and Microsoft advises minimising computer use because new activity can overwrite free space. It also warns not to create a partition after data loss. (Microsoft Support)
If you use recovery software, choose a current tool from a reputable publisher that supports your operating system, file system and SSD connection. Read its documentation before starting, confirm which disk is the source, and direct output to another physical drive. A preview or file listing is not proof that a recovered document, photo or database is intact; open representative files and verify folder structure, dates and application data.
DIY should be one controlled attempt, not a sequence of random utilities. Stop if scans produce read errors, the drive disconnects, capacity changes, the system becomes unstable or the SSD heats abnormally. Do not run CHKDSK, First Aid, formatting, firmware updates or cloning tools on an unstable drive just to see what happens. Some of those operations can write to the source or increase the workload.
When professional SSD data recovery is safer
Choose professional assessment before DIY when the only copy is irreplaceable, the loss affects active business operations, or the SSD shows signs of hardware, controller or firmware trouble. Professional workflows can include controlled diagnostics, write-blocked access, imaging a readable device to stable media, working around firmware or controller faults, and reconstructing data from an image rather than repeatedly scanning the original. The exact method depends on the SSD model and failure.
This distinction is important: a local computer technician may handle backups, logical recovery and diagnosis, while a specialist data-recovery laboratory may be required for controller-level, encrypted or NAND-level work. Not every SSD needs a cleanroom, and opening an SSD enclosure is not the same as opening a mechanical hard drive. Ask the provider whether the work is performed in-house, whether the original device may be altered, and when it would be referred to a specialist.
Professional recovery is not a guarantee. SSD controllers may encrypt or scramble data internally, flash chips may be degraded, and the mapping information needed to rebuild files can be damaged. A competent provider should explain uncertainty rather than quote a universal success rate.
Before approving work, ask:
- What does the initial assessment involve, and could it modify the SSD?
- Will you image the device before file-system repair where possible?
- Is the recovery performed in-house or by another laboratory?
- How will my data be stored, accessed and securely returned or destroyed?
- Will I receive a list or sample verification of recoverable files before proceeding?
- What charges apply for assessment, parts, attempted recovery and return media?
- What happens if the SSD is encrypted and I cannot provide the recovery key?
For sensitive personal or business information, confidentiality and chain of custody may matter as much as technical capability. Get the scope, handling arrangements and price in writing rather than relying on a vague “no recovery, no fee” claim.
DIY vs professional recovery at a glance
| Decision factor | Limited DIY recovery | Professional assessment |
|---|---|---|
| Best fit | Stable, detected SSD; simple logical loss; replaceable or lower-value data | Unstable, undetected, damaged or encrypted SSD; irreplaceable or business-critical data |
| Main advantage | Immediate and potentially lower direct cost | Controlled diagnosis, imaging and access to specialist tools or referrals |
| Main risk | Writes, incorrect disk selection, excessive scanning or delayed escalation | Higher cost, transport/privacy considerations and no guaranteed result |
| TRIM-deleted files | Software may find little or nothing after deallocation | Specialist tools cannot recreate data that the device no longer exposes, though assessment can rule out other paths |
| Destination | Must be a different physical drive | Provider should return recovered data on separate media |
| Stop point | Any instability, read errors, heat, damage or uncertainty | Provider should explain limits and seek approval before invasive work |
Encryption and recovery keys can decide the outcome
A healthy recovery image can still be unreadable without the encryption key. Windows devices may use BitLocker or Device Encryption; Macs may use FileVault; some SSDs also perform transparent hardware encryption internally. Do not clear a TPM, reset firmware settings, erase the Mac, reinstall the operating system or discard an account until you have checked for the relevant recovery key and verified backups.
If the computer still starts, record the encryption status and safely locate the recovery information before changing hardware. If it does not start, check the owner's Microsoft, Apple or organisational account records from another trusted device. A recovery provider should ask about encryption early because it affects both feasibility and process. Never send passwords or recovery keys through an insecure channel.
What not to do with a failing SSD
Several tempting actions can reduce the options:
- Do not initialise or format a drive because Windows prompts you to.
- Do not reinstall Windows or macOS onto the affected SSD.
- Do not save recovered files to the source device.
- Do not repeatedly power-cycle an intermittent SSD.
- Do not open the SSD, desolder flash chips or swap controllers at home. Modern SSD data layout and controller behaviour make simplistic donor-part swaps unreliable.
- Do not run a firmware update on a failing drive unless the manufacturer or recovery specialist has assessed the data risk.
- Do not disable TRIM after the event expecting deleted data to reappear.
- Do not run repair utilities before you understand whether they write changes.
If the next proposed step is destructive and there is no verified backup, stop. A fresh diagnosis preserves more choices than an irreversible “fix”.
After recovery: verify, replace and back up
Recovery is not finished when files appear in a folder. Open a representative sample, check important databases or email archives in their applications, compare counts where possible and keep the recovered copy untouched until a second backup exists. Do not return a suspect SSD to normal service simply because one scan completed. Replace it if diagnostics or behaviour indicate failure.
Then build recovery out of the routine. Keep important files in more than one place, automate backups where practical and test that you can restore them. An external drive can provide a local copy; cloud storage can add an off-device copy, but synchronisation alone may replicate accidental deletion. Perth Computer Experts has a practical guide to protecting data and testing backups, and households needing shared local storage can review NAS setup and backup destination options.
If your SSD is unstable, physically damaged or holds the only copy of important files, leave it powered off and arrange an assessment. Describe exactly what happened, what you have already tried, whether the drive is encrypted and which files matter most; that information helps determine whether local diagnosis or a specialist laboratory is the appropriate next step.