
PC Fan Noise: When to Clean, Repair or Replace It
Learn what different PC fan noises mean, how to clean a desktop safely, when replacement is needed and when to arrange professional help.
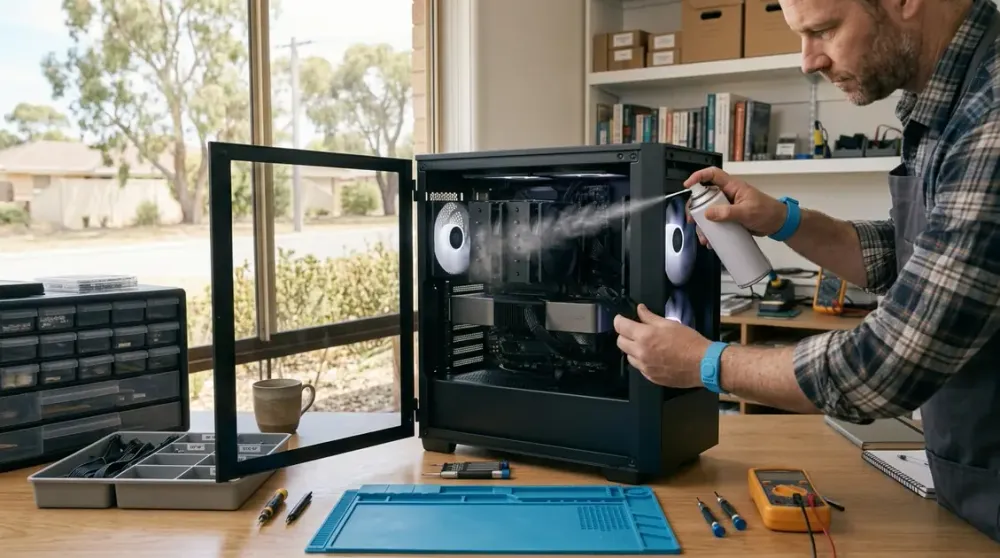
Does your computer sound like it is preparing for take-off? A short burst of fan noise during startup, gaming, video editing or another demanding task can be normal. A fan that suddenly stays loud, rattles, clicks or accompanies overheating deserves attention.
The useful question is not simply “How do I make the fan quieter?” It is “Why is the fan loud, and can I reduce the noise without reducing safe cooling?” This guide helps you identify the likely fan, distinguish normal behaviour from a fault, clean a desktop safely, decide when replacement makes sense, and recognise when a laptop or CPU cooler is better left to a technician.
Key takeaways
- Brief fan-speed increases under heavy load can be normal; new grinding, clicking, scraping or persistent full-speed operation is not.
- Clean blocked vents and dust before buying parts, but never open a power supply or work on a powered computer.
- Replace a fan that is physically damaged, stalls, will not spin or remains mechanically noisy after safe cleaning.
- Match replacement parts to the exact computer, connector, size and cooling requirement rather than choosing on airflow or price alone.
- Repeated thermal shutdowns, a burning smell, smoke, sparks, liquid exposure or a swollen laptop battery are stop signs for professional help.
First decide whether the noise is normal
Computer fans respond to heat. A CPU or graphics processor doing more work produces more heat, so the control system raises fan speed. Intel describes thermal throttling as a protective reduction in processor speed when a temperature limit is reached; it is a warning to investigate cooling, not a reason to defeat thermal safeguards (Intel: processor throttling).
A louder fan may therefore be normal when you start a game, export video, install updates or run many browser tabs. It should usually settle after the workload ends. Thin laptops can change speed quickly because their smaller cooling systems have less room to absorb heat.
Investigate when the sound is new, persists at idle, has become progressively worse, or appears with sluggish performance, excessive case heat, freezes or shutdowns. Dell notes that obstructed vents, dust, inadequate ventilation and physical fan damage are common causes of abnormal fan behaviour (Dell: troubleshooting fan issues).
What the sound can tell you
- A steady rush of air: often high fan speed caused by workload, warm intake air, restricted vents or an aggressive performance mode.
- A pulsing rise and fall: may occur when temperature sits close to a fan-control threshold. Background software, blocked airflow or an unsuitable fan curve can make it more noticeable.
- Rattling or buzzing: can come from a loose panel, cable touching a blade, worn bearing, damaged blade or vibration transferred into the case.
- Clicking, grinding or scraping: points more strongly to mechanical interference or fan wear. Shut down and inspect rather than letting it continue.
- No fan sound with overheating: is not reassuring. The fan may be stopped, disconnected or unable to start.
- A gurgle from a liquid-cooled desktop: may relate to trapped air or pump trouble rather than a conventional fan. Follow the cooler maker’s instructions or arrange diagnosis.
Do not assume every whine comes from a fan. A hard drive, optical drive, pump or electrical component can make a similar sound. Never put fingers or tools near a moving fan. With the case closed, listen from different sides and note whether the sound changes with CPU-heavy or graphics-heavy work. If you cannot identify it safely, stop there.
Check the easy causes before opening anything
Start with observation and reversible changes:
- Save your work and let the computer idle. Close a demanding program normally and wait a few minutes. If the fan settles, the workload was probably contributing.
- Check the surface and clearance. Use a laptop on a hard, level surface, not a bed, sofa or blanket that blocks underside vents. Keep desktop intake and exhaust vents clear of walls, curtains and clutter.
- Look for dust at external vents and filters. A visible dust mat restricts airflow. Removable desktop filters can usually be cleaned according to the case manual.
- Check recent changes. A new application, performance mode, graphics-card load or hardware installation can change heat and fan behaviour. Use the computer or motherboard manufacturer’s supported diagnostics where available.
- Record the symptoms. Note when the noise starts, whether the computer is hot, and whether there are errors or shutdowns. This is more useful than relying on one temperature reading.
Temperature limits differ by processor, graphics card and computer design. Use the manufacturer’s specification and diagnostic tools rather than a universal “safe temperature” copied from a forum. Also avoid downloading an unknown fan-control utility merely because it promises silence.
If the manufacturer provides a supported quiet, balanced or performance mode, a quieter mode can be reasonable for light work. Do not disable fans or impose a very low maximum speed. Intel says dynamic thermal controls balance workload, temperature and fan activity, and does not recommend disabling those controls unless the system manufacturer directs it (Intel Dynamic Tuning overview).
How to clean a noisy desktop PC safely
Cleaning is the sensible first repair when vents, filters, fan blades or heatsink fins are dusty and the fan still turns smoothly. It cannot repair a worn bearing, broken blade or failed motor.
Stop immediately if you notice a burning smell, smoke, sparks, liquid inside the computer, melted wiring or repeated thermal shutdowns. Disconnect power if it is safe to do so and arrange qualified help. Never open the power-supply unit: dangerous stored voltages can remain after the PC is unplugged. Dell specifically warns users not to open a desktop PSU to clean its fan (Dell: troubleshooting fan issues).
For a desktop you are comfortable opening:
- Check the manual and warranty terms. Some cases open easily; compact and proprietary computers may not. In Australia, voluntary warranty terms do not replace automatic consumer guarantees under Australian Consumer Law (ACCC: warranties). Contact the seller or manufacturer if the machine is new or the repair may affect a claim.
- Shut down fully. Switch off at the wall, unplug the power lead and disconnect peripherals. Let hot components cool. Move the computer to a dry, well-ventilated work area.
- Discharge static safely. Avoid carpet and synthetic clothing. Use an appropriate anti-static method and handle components only by their edges.
- Remove the side panel only. Do not dismantle the PSU. Photograph cable positions if you may need a reference.
- Prevent fans from free-spinning. Hold a fan gently by its hub while using short bursts of electronics-safe compressed air. Follow the can’s directions, keep it upright and do not spray liquid propellant. Do not use your mouth; moisture can damage electronics. Dell recommends compressed air and warns that vacuum cleaners or blowers can create static and damage internal parts (Dell cleaning guidance).
- Clear the airflow path. Work dust out of filters, heatsink fins, case intakes and exhausts. Use a clean, soft brush only where appropriate. Keep moisture away from boards, sockets and connectors.
- Inspect without forcing anything. Check for a cable close to a blade, loose fan screws, a cracked mount or a visibly damaged blade. Do not bend blades back into shape.
- Reassemble before testing. Confirm no tool or loose cable remains inside, replace the panel, reconnect power and listen from outside the case.
Cleaning frequency should follow the environment, not a rigid calendar. A PC near carpet, pets, smoke, renovation dust or an open window may need inspection more often than one in a clean room. Check filters and vents periodically and clean when buildup begins to restrict them.
Laptops and all-in-one computers need more caution
You can usually clear accessible external vents with the computer off and unplugged, following its manual. Internal access varies greatly: hidden clips, delicate ribbon cables, adhesive batteries and shared heat pipes turn a simple-looking fan job into a model-specific repair.
Do not open a laptop with a swollen battery, chemical smell, heat damage or liquid exposure. Stop using and charging it, keep it away from flammable material without puncturing or pressing the battery, and seek appropriate service. If the laptop is under warranty, confirm the authorised repair path first.
When cleaning is enough and when the fan needs replacing
Cleaning is likely to help when the noise is mainly rushing air, dust is visible, temperatures and noise improve after airflow is restored, and the fan rotates smoothly without wobble or scraping.
Replacement is more likely when:
- a blade is cracked, bent or missing;
- the fan stalls, starts intermittently or does not spin when the system expects it to;
- grinding, clicking or bearing rattle continues after debris and loose cables are ruled out;
- the hub wobbles or the fan rubs its frame;
- the correct fan header reports no speed despite a secure connection; or
- manufacturer diagnostics identify a fan fault.
A fan that stops at low temperature is not automatically faulty; some modern graphics cards and power supplies use zero-RPM modes. Check the manufacturer’s design before replacing it. Conversely, never “help” a reluctant fan start with a finger or tool.
Also distinguish the part involved. A case fan is usually a standard frame mounted to the chassis. A CPU cooler includes a heatsink and one or more fans; sometimes its fan can be replaced separately, while proprietary designs require the assembly. A graphics-card fan, laptop blower, all-in-one fan or liquid-cooler pump is model-specific. A PSU fan is not a user-serviceable invitation to open the PSU; replace the sealed unit or have it serviced through an appropriate channel.
How to choose a compatible replacement
Do not buy on diameter or a low advertised decibel figure alone. Confirm:
- exact computer, motherboard, case, graphics card or cooler model;
- fan dimensions, including thickness and mounting-hole spacing;
- connector type, pin count, voltage and control method;
- cable length and header location;
- airflow direction and available clearance;
- whether the motherboard expects a tachometer signal; and
- for a CPU cooler, socket support and sufficient thermal capacity for the processor.
Intel’s current guidance says a desktop CPU cooling solution must match the processor socket and meet or exceed the processor’s base-power requirement (Intel: choosing a thermal solution). For a proprietary desktop or laptop, use the manufacturer’s part number or service manual rather than assuming a generic part fits.
Three-pin and four-pin case fans can sometimes connect electrically, but speed control may differ. ARCTIC explains that a three-pin fan on a four-pin header may run at a fixed speed unless the board supports voltage control (ARCTIC: 3-pin fan on a 4-pin port). Check the motherboard manual rather than changing firmware settings by guesswork.
Airflow, static pressure, speed range and acoustic measurements are useful only when compared under stated conditions. A radiator or dense heatsink may favour a fan designed for static pressure; an open case position may favour airflow. Adding more fans is not automatically quieter or cooler: placement, direction and control matter, and poorly balanced airflow can increase dust or turbulence.
DIY replacement or professional repair?
A like-for-like desktop case-fan replacement can be a reasonable DIY job if you have the exact compatible part, understand static precautions, can route the cable away from blades and do not need to alter firmware. Photograph the original orientation before removal; fan-frame arrows often indicate airflow and blade rotation. Power must remain disconnected while you work.
CPU-cooler work carries more risk. Removing the heatsink breaks the thermal interface between it and the processor. Intel advises replacing thermal interface material when the processor or fan-heatsink is reinstalled and says not to add paste when a new heatsink already has material applied (Intel: thermal interface material). Mounting pressure, socket hardware and paste instructions vary, so follow the exact cooler and motherboard documentation.
Professional diagnosis is the safer choice when:
- the noisy component cannot be identified confidently;
- the computer is a laptop, all-in-one, mini PC or proprietary desktop;
- replacement requires removing the motherboard, graphics-card shroud or liquid cooler;
- the CPU cooler must be removed and you are unfamiliar with the socket;
- the system continues to overheat after external airflow and dust checks;
- important work depends on the computer and downtime must be controlled; or
- any stop condition in this guide is present.
Avoid generic online price estimates. The real cost depends on diagnosis, access difficulty, part availability and whether the fault is the fan, cooler, pump, sensor, motherboard or another component. Compare a confirmed parts-and-labour quote with the computer’s age, condition and replacement value.
Test the result without trading cooling for silence
After cleaning or replacement, check that every disturbed connector is secure, the fan starts as designed, cables remain clear and airflow direction is correct. Use the computer maker’s diagnostics and observe it first at idle, then under a normal workload. Do not begin with an extreme stress test.
Listen for mechanical noise, watch for error messages and check whether the original symptom returns. If temperatures climb unusually, the computer throttles, or it shuts down, stop testing. Recheck the installation only if you can do so safely; otherwise arrange diagnosis.
For supported desktops, a manufacturer-provided balanced or quiet profile may reduce needless speed changes after hardware health is confirmed. Keep protective limits intact. A quiet computer that cannot remove heat is not a successful repair.
Prevent fan noise from returning
- Keep vents and removable filters clear and place the computer on a firm surface with breathing room.
- Inspect more often in dusty rooms or homes with shedding pets; clean according to visible buildup and manufacturer guidance.
- Keep desktop cables secured away from blades and preserve a clear front-to-back or bottom-to-top airflow path.
- Use supported system, firmware and graphics updates when the manufacturer identifies a relevant thermal-control fix; do not flash firmware solely as a speculative noise remedy.
- Investigate a new sound early. A loose cable or worn fan is easier to address before repeated overheating interrupts work.
- Replace thermal paste when a cooler is removed or when model-specific diagnosis supports it, not simply because a fixed number of years has passed.
Perth’s hot weather can raise the temperature of the air entering a computer, especially in an uncooled room. That can make a healthy fan work harder, but it does not prove the fan is faulty. Improve room ventilation and keep direct sun off the computer; never obstruct vents to muffle sound.
If safe cleaning does not resolve the noise, Perth Computer Experts’ custom PC and hardware-upgrade service covers cooling faults, compatibility checks and component replacement for Perth home users. A clear description of the sound, when it occurs and any shutdowns will make diagnosis more efficient.