
How to Find a Compatible Laptop Screen for an Older Model
Learn how to identify, verify and source a compatible replacement screen for an older laptop without relying on size, pin count or seller claims alone.
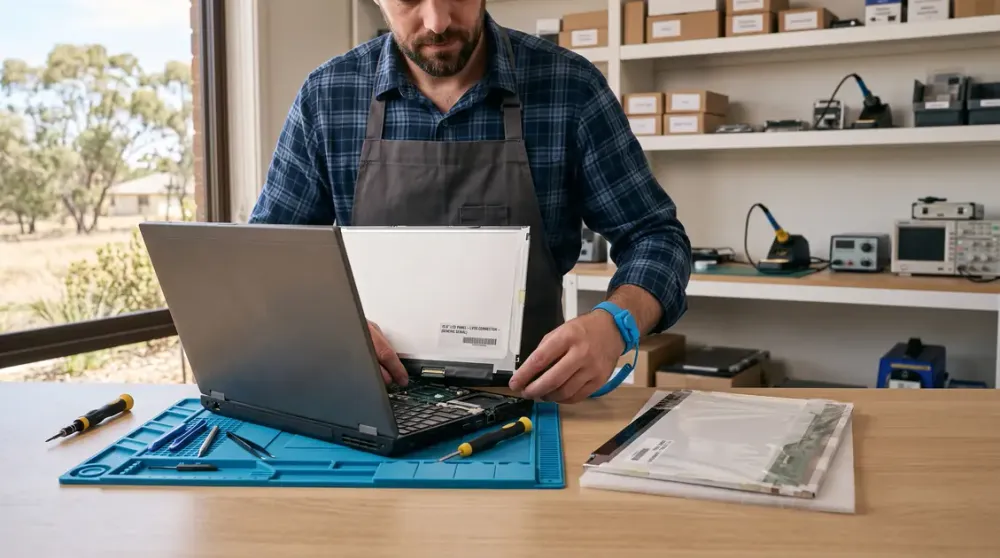
A replacement laptop screen can look right in a product photo and still be electrically or mechanically wrong for your computer. On older laptops, the model name alone may not settle the question because one model family can ship with several display options.
The safest approach is to diagnose the fault first, identify the exact laptop and original panel, then compare the complete specification before buying. This guide explains what must match, how to assess listings and quotes, what affects cost and turnaround time, and when an upgrade or do-it-yourself repair is a poor gamble.
Key takeaways
- Match the exact laptop variant or original panel part number before relying on screen size or connector pin count.
- Size, resolution, connector location, interface, mounting, thickness, touch capability and electrical requirements all matter.
- Most modern laptop screens sold as “LED screens” are LED-backlit LCD panels; LED versus LCD is not the useful buying decision.
- Parts availability usually drives the delay for an older model, while panel type and construction drive much of the cost.
- Stop if the battery is swollen, the laptop has liquid damage, or the model-specific service procedure is unclear.
Confirm that the screen is actually faulty
A cracked panel, spreading black blotches or ink-like marks are strong signs of physical display damage. Lines, flickering, a dim image, incorrect colours or a blank screen are less conclusive. Similar symptoms can come from the display cable, hinge damage, graphics hardware, power circuitry, firmware or software. A failed backlight can also leave a very faint image that is visible only under careful inspection.
Start with non-invasive checks. Restart the laptop, note whether the fault appears on the manufacturer's logo or firmware screen before the operating system loads, and connect a known-working external monitor if the laptop supports one. A normal external image makes the internal display path more suspect, but it does not distinguish the panel from its cable or connector. If the fault appears only after Windows loads, software or a display setting remains possible.
Some manufacturers provide model-specific hardware tests. Dell's current LCD built-in self-test guidance explains that its test checks screen hardware rather than Windows settings or graphics drivers. Use only a diagnostic documented for your exact brand and model; do not assume another manufacturer's key combination applies.
If the laptop has suffered a drop, inspect the hinges and lid as well as the image. A new panel will not correct a bent lid, broken hinge mount or pinched cable. After liquid exposure, a burning smell, smoke, sparks, unusual heat or a swollen battery, turn the machine off, unplug it and seek professional help. Do not keep powering it up to test the display.
Identify the exact laptop and original panel
Record the complete model identifier, serial number or service tag from the base label, firmware information screen or manufacturer's support utility. A retail family name such as “Inspiron 15”, “Pavilion” or “IdeaPad” is normally too broad. Include the suffix, machine type, product number or configuration code.
Next, consult the manufacturer's support page, maintenance manual or parts catalogue for that identifier. HP directs owners to PartSurfer using a product number, serial number or product name, while Lenovo Parts Lookup can search by serial or part number. These tools may reveal several panels approved for one laptop because the range was sold with different resolutions, touch options or suppliers. Record the display assembly and panel spare numbers relevant to your configuration.
The most reliable cross-check is the label on the back of the original bare panel. Accessing it usually means removing the bezel or display assembly, so do not open the laptop merely to browse if you lack the correct service manual or repair experience. Photograph every label and connector before ordering. A panel model might resemble B156..., LP156... or another manufacturer-specific code; copy it exactly, including the revision suffix. Do not confuse a regulatory number, barcode or lid assembly number with the panel model.
If the old panel cannot be read or has already been removed, give a supplier the full laptop identifiers, original resolution, touch status and any known display option. Ask the supplier to confirm compatibility in writing and state whether the item is the exact part or a compatible substitute.
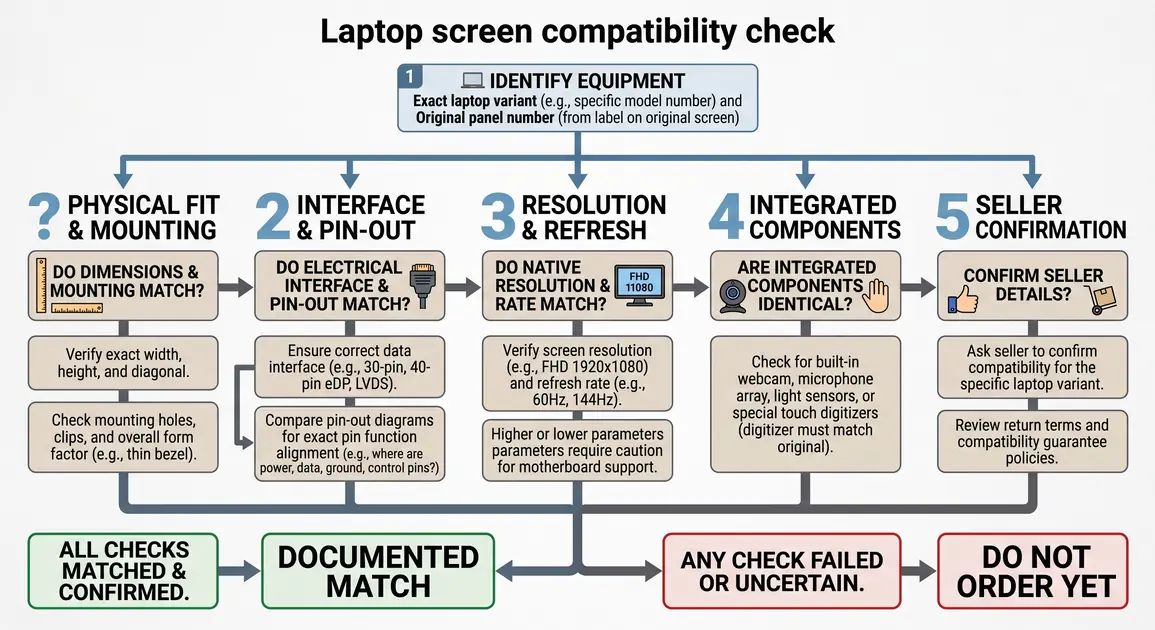
Check every compatibility requirement
No single specification is enough. Work through the following list and treat an unknown as something to resolve before purchase.
Physical fit and mounting
The diagonal size must match, but the outer dimensions, thickness and corner shape also matter. Check whether the panel uses side brackets, top and bottom tabs, adhesive strips or a bracketed assembly. Connector position matters because the existing cable has limited length and routing. A socket on the wrong side can make an otherwise similar panel unusable.
Bezel construction is equally important. Many newer designs use adhesive and narrow bezels; older machines may use screws and snap clips. Touchscreen laptops are often serviced as a bonded display assembly containing glass, digitiser and LCD rather than as a simple bare panel. Confirm whether the listing is for a bare panel, a touch module or the complete lid assembly.
Interface, connector and signal
Check the interface family—commonly embedded DisplayPort (eDP) on later machines and low-voltage differential signalling (LVDS) on many older ones—along with the exact connector, pin count, pitch, keying and location. VESA describes eDP as a standardised, scalable interface with different requirements and options. That is why “30-pin eDP” or “40-pin” alone is not a compatibility guarantee. Lane configuration, power, backlight control and optional features can differ.
Never force a connector or modify a cable to make it fit. A wrong pin-out or voltage can damage the panel or laptop. If a seller cannot identify the interface beyond a generic pin count, find a better-documented part.
Resolution, refresh rate and firmware support
The safest replacement matches the original native resolution and refresh rate. A higher-resolution panel may share the same physical size yet require a different cable, more eDP lanes, different firmware support or more bandwidth. A high-refresh gaming panel creates similar risks. Some upgrades work only when the manufacturer offered that display with the same chassis and the matching cable is installed.
Match the screen orientation and aspect ratio as part of the physical specification. Brightness, colour gamut, contrast and viewing technology such as IPS or TN affect image quality, but they come after electrical and mechanical compatibility. Treat an upgrade as a separate engineering check, not an automatic benefit.
Touch, camera and other integrated features
A touchscreen needs the correct digitiser, touch cable and firmware support. A complete display assembly may also contain the webcam, microphone, Wi-Fi aerials, ambient-light sensor or lid-angle sensor. Compare those components and cable routes when replacing the whole lid rather than the bare LCD panel. Some current Mac repairs also require a documented post-repair software step; Apple's Self Service Repair overview tells users to begin with the manual for the exact product and repair type.
LED versus LCD: clear up the terminology
LCD describes the image-forming panel. LED usually describes the backlight behind an LCD. Consequently, the vast majority of laptop panels advertised as LED screens are still LCDs; “LED versus LCD” is usually a misleading either-or choice. Much older laptops can use a cold-cathode fluorescent lamp (CCFL) backlight with an inverter, while later LCDs generally use LED backlighting. OLED is a genuinely different self-emissive display technology, but it cannot be substituted merely because size and resolution match.
For an older CCFL-equipped laptop, converting to an LED-backlit panel may require a compatible conversion cable or kit, changes to the backlight power arrangement and enough physical space. Poorly specified kits can introduce brightness-control problems or electrical risk. A like-for-like replacement is safer unless a documented conversion exists for the exact machine.
Do not select a panel on the promise that “LED is brighter” or “IPS is better”. Compare measurable specifications and intended use. A compatible IPS panel can improve viewing angles, while colour-critical work also requires suitable gamut and calibration. None of those advantages compensates for an incompatible cable, mounting system or firmware.
Evaluate sellers and replacement options
You may find an original equipment spare, a new compatible panel, a refurbished unit, a used pull from another laptop or a complete display assembly. “OEM” is often used loosely in listings, so ask for the actual panel manufacturer and model. Laptop brands commonly source panels from several display manufacturers; a compatible panel need not carry the laptop brand, but its full specification must match.
Before paying, request: the exact panel model or a clear compatibility commitment; condition and dead-pixel policy; whether brackets, adhesive, bezel, cable and touch digitiser are included; warranty and return terms; the return process if the seller supplied the wrong substitute; packaging standards; and the dispatch location. For marketplace listings, assess the seller's recent feedback and read the exclusions rather than relying on the headline. Avoid stock photos when the listing claims to sell a particular used panel revision.
For scarce parts, compare the landed cost to the condition of the laptop. International freight to Perth can add delay, and returning a fragile panel overseas may be uneconomical. A local quote can be useful when it includes diagnosis, verified part sourcing, labour, testing and responsibility for a faulty or incompatible supplied part.
What affects replacement cost and turnaround time?
There is no dependable universal price or completion time. Exact figures depend on the device, part supply and repairer, so obtain a written quote rather than using old online ranges. The largest variables are:
- whether the fault is the panel, cable, hinge, lid or graphics hardware;
- availability of the exact part and whether it must be imported;
- standard non-touch panel versus touch, OLED, high-resolution or high-refresh hardware;
- bare-panel replacement versus a bonded or complete display assembly;
- extra damage to the bezel, lid, hinge mounts, aerials or cables;
- labour needed to remove adhesive and transfer integrated components; and
- warranty coverage, freight, return risk and post-repair calibration or configuration.
The hands-on panel swap may be shorter than the total job. Diagnosis, ordering, shipping, workshop queue, adhesive curing where applicable and final testing all affect turnaround. Older or uncommon models often wait longest for parts. Ask whether the quoted time begins when the laptop is booked in or when the correct part arrives, and what happens if the diagnosis changes.
Check the laptop manufacturer's warranty and any accidental-damage cover before opening the case. Coverage depends on the plan and cause of damage; do not assume an accidental crack is included. Likewise, do not assume that any independent repair automatically cancels every consumer right. Ask the manufacturer or insurer how the proposed repair affects the specific coverage.
Decide whether repair or replacement makes sense
Avoid simplistic rules such as replacing the laptop whenever repair exceeds a fixed percentage of its value. Instead, compare the complete repair quote with the cost of a suitable replacement computer, then consider the laptop's processor, memory, storage, battery, hinges, charger, operating-system support and overall condition. Also account for setup time, data transfer and software licences if you replace it.
Repair can make sense when the machine still meets your needs, the rest of the hardware is sound, the part is obtainable and the quote is proportionate to the useful life you expect. Replacement is more attractive when several components are failing, security updates are no longer available for the operating system, performance is inadequate or the correct display assembly costs close to a materially better computer.
An external monitor can be a practical temporary workaround if the laptop is stable and there is no electrical, battery or liquid-damage concern. It is less useful for a laptop that must remain portable, and it should not be used to ignore a damaged hinge or exposed glass. Back up important files before handing the computer over or attempting hardware work—not because screen replacement normally erases storage, but because any repair carries handling risk.
If you are considering a DIY replacement
First locate the official service manual for the complete model number and read the whole relevant procedure. Compare the required tools and prerequisites with your experience. Current manufacturer manuals demonstrate why generic five-step instructions are unsafe: a Dell Latitude procedure, for example, requires the base cover and battery to be removed before the display assembly, while the cable brackets, adhesive and screw sequence vary by model.
Before opening the machine, shut it down, unplug the charger and peripherals, and follow the manual's method for disconnecting or removing the battery. Use electrostatic-discharge precautions and keep screws organised by location; a long screw in the wrong hole can damage the case or electronics. Never work on the display cable with battery power connected. Do not use metal tools near the battery or puncture, bend or compress it.
Stop and obtain professional help if the battery is swollen, the display uses unfamiliar adhesive, the hinges or lid are bent, glass is splintering, liquid has entered the machine, the cable or connector is burnt, or the instructions require tools and calibration you do not have. Apple states that its Self Service Repair program is intended for people experienced with electronic-device repair; that is a useful threshold for any thin, adhesive-heavy laptop.
After a documented replacement, inspect the cable routing before closing the case. Test the display at several brightness levels, look for lines, flicker, pressure marks and dead pixels, test sleep and wake, and check touch, camera and Wi-Fi if those components were disturbed. If there is no image, shut down and disconnect power before rechecking anything. Repeatedly reconnecting a live display cable can turn a fitment problem into board damage.
Troubleshoot problems after installation
A blank screen immediately after replacement most often calls for checking compatibility and the cable seating with all power disconnected. Also confirm that no connector pins or locking tabs were damaged. If the external monitor still works, that narrows the fault but does not prove the new panel is defective.
Flicker, intermittent lines or an image that changes as the lid moves can indicate a poorly seated, damaged or pinched cable. Persistent lines or colour faults visible in a manufacturer hardware test may point to the panel. Brightness controls that do not work can indicate an incompatible backlight-control arrangement, cable or firmware—not merely a graphics driver.
Wrong scaling or a resolution option missing only after Windows starts may be software-related, but first confirm the panel specification. Install graphics drivers only from the laptop or graphics manufacturer's official source. Do not flash firmware or edit the registry as a speculative screen fix. If the correct part and cable are installed but the display remains faulty, stop before causing further damage and have the panel, cable and board tested.
A practical buying checklist
Before ordering, make sure you can answer yes to each item:
- The full laptop model, product number and serial or service tag are recorded.
- The fault has been diagnosed beyond simply assuming every blank image needs a panel.
- The original panel model or manufacturer-approved spare number is known.
- Size, outer dimensions, thickness, mounting and connector position match.
- Interface, pin-out, resolution, refresh rate and backlight requirements match.
- Touch and integrated component requirements are accounted for.
- The seller has confirmed the exact model or substitute and provided a usable return policy.
- The total repair cost and likely parts lead time make sense for the laptop's condition.
- Important files are backed up, and a model-specific repair manual is available if you will open the laptop.
For an older laptop in Perth, the valuable part of professional help is not simply fitting a screen; it is confirming the diagnosis, sourcing a defensible match and testing the complete display path. If any identifier or specification remains uncertain, get the laptop assessed and request a written parts-and-labour quote before ordering a fragile panel yourself.